
Previous | Next
|
|
Contents page Previous | Next |
Connecting a TeeChart control to Databases can be done at design-time using the Chart Editor and at run-time with few lines of code. You should use the TDBChart component as, as the name suggests, this TeeChart component supports data access. TDBChart installs on the Data Controls section of the Component Palette. TDBChart inherits all TChart properties and methods, the key difference being that it also includes access to Borland's Database Engine thus increasing the size of projects compiled with this component. For this reason we recommend that you use the TChart component unless you wish to connect directly to data sources.
TeeChart connects to all TData components including RAD Studio TFDTable or a TFDQuery, or older BDE sets such as a TTable or TQuery and TClientDataset. When connecting to Tables or Queries it is not necessary to use the TDataset component as TeeChart will make the connection directly.
Any Series can be connected to tables or queries using the Chart Editor. Every Series can be connected to the same or different table or query in the same or different database.
This design gives you total flexibility on how you connect Charts to databases, as you aren't restricted to only one database or to only one table or query.
Data is also retrieved at design-time so you see the actual data during development.
The following steps assume you have put either a TFDTable or a TFDQuery, BDE TTable, TQuery or TClientDataset on your Form. For this example you could connect the TTable to the TeeChart Pro Database, installed as an ODBC v3 DSN, during the installation of TeeChart Pro and select the Employee Table.
At design-time, the steps necessary to connect a Series to a Datasource are:
At this point you will see this screen:
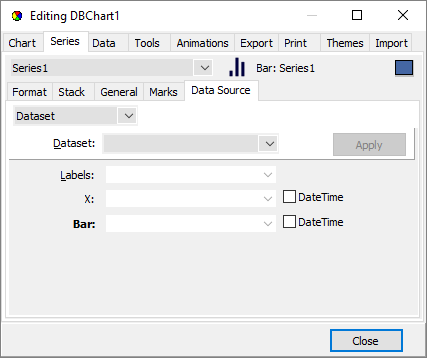
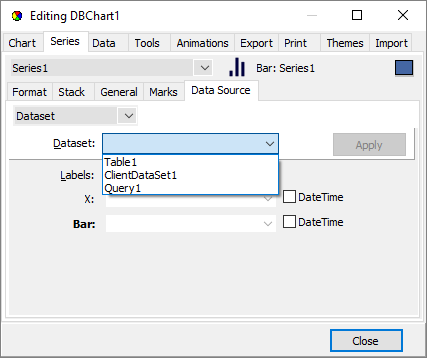
By selecting an item from the Combobox you connect the Series to the specified Table or Query.
Now you should define which Fields from the Table or Query should be retrieved and added to the Series. This is done with the Chart editor, by selecting the appropriate fields for each Series part.
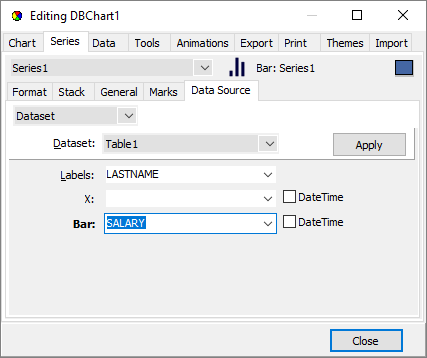
Each Series has a "Label" field (which should be of type "String" or "Char") ,and a value field (the "Bar" field for Bar Series), which should be of either integer, floating or date-time field type.
In this example, we have selected the "LASTNAME" field from the "Employee" table for the Series labels, and the "SALARY" numeric field for the Bar point values.
See the DataSet combobox in the above picture. This combobox shows the available tables or queries you have created. You can always come to this dialog and select a different dataset, or edit it by clicking the "Edit..." button.
Now we have assigned the appropiate fields, it's time to see the results.
At this time, the TChart control will try to open the selected Datasource database Table or Query, and will start retrieving records and adding values to the selected Series.
In our example, you'll see at design-time the following Chart:
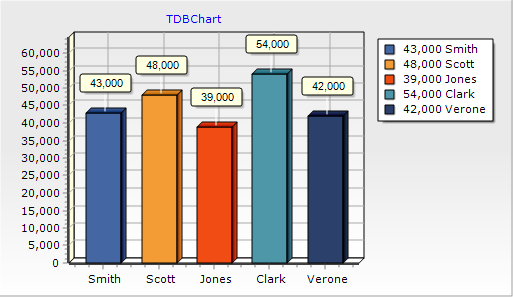
Now, if you run the project, the Chart will retrieve all records from Datasource and will add values to the Series. You will see the same Chart you saw at design-time before running the project.
See also the included DB examples under the "Examples" folder.
The above design-time steps can be reproduced programmatically with few lines of code. This gives you more freedom and control over database operations.
Repeat the first 3 steps above on a new project and a new Form.
Every Series has the TChartSeries.Datasource property, which determines the origin of database values (the Table or Query), and the "YValues.ValueSource" and "LabelsSource" properties to specify which fields we want to plot.
The syntax for LabelsSource and YValues.ValueSource properties is:
Series1.YValues.ValueSource := 'SALARY';
Series1.XLabelsSource := 'LASTNAME';
And the syntax for Series DataSource is:
Series1.DataSource := Table1;

//or

Series1.DataSource := Query1;
It is recommended you set the above properties in that order. First set the TChartSeries.XLabelsSource and the TChartValueList.ValueSource and then the DataSource property.
In case the database values are changed and you want to "refresh" the connection and retrieve the values again, you should do this:
Series1.CheckDataSource;
The TChartSeries.CheckDatasource method will force the Series to retrieve all records again.
All Series have also the "XValues.ValueSource" property. This property is used for XY charting only (when you have an X coordinate for each point).
An error will be raised if TeeChart can not locate the datasource or it can not open the Table or SQL query you specify. Remember to set your Datasource to 'Active'.
Single Record data charting allows retrieval of data horizontally from a record of a datasource. Choose the 'Single Record' option from the TeeChart Editor Datasource combobox.
Example:
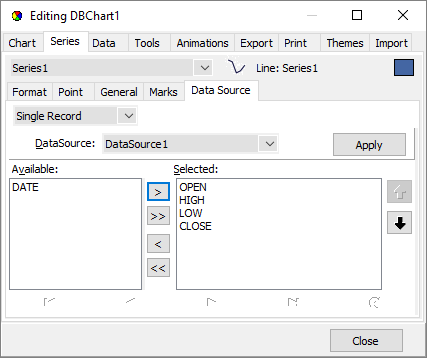
The above definition takes the first record from TeeChart's example Stock table and plots the Open, High, Low and Close values as different points for one Series.
Data retrieved via TeeChart's dataset connectivity may be grouped by differing fields of the dataset to create summaries by the selected field. Select 'Summary' from the TeeChart Editor Datasource combobox
Example:
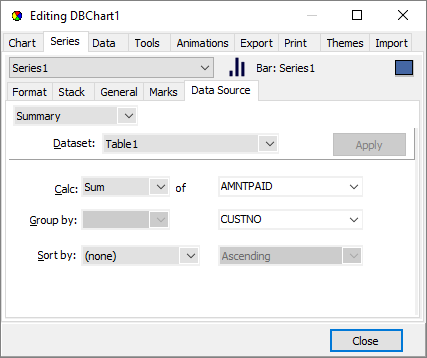
The above selection plots a Bar Series of Delphi/C++Builder's 'Orders' table 'AmountPaid' field, grouping the result by Customer number 'CustNo'.
If the dataset contains a datetime field you may select grouping criteria from the first 'Group by' combobox as a DateTimeStep. The following groups the average 'AmountPaid' by Quarter year using 'Saledate'.
Example:
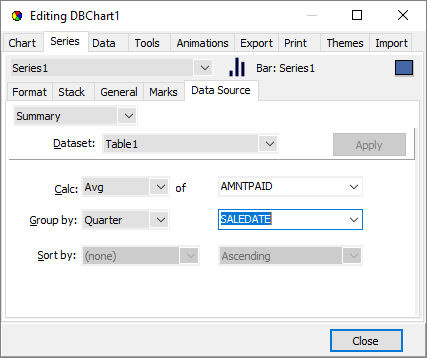
By code the above would look like this:
  With Series1 do
  Begin
    DataSource:=Table1;

    YValues.ValueSource:='#AVG#AmountPaid';

    XLabelsSource:='#QUARTER#SaleDate';
  end;
The TChart control provides an event which gets called every time a record is retrieved and added to a Series.
This event is the "OnProcessRecord", and has this syntax:
procedure TForm1.DBChart1ProcessRecord(Sender: TCustomDBChart;
  DataSet: TDataSet);
begin
end;
You can use this event to raise a silent Abort to stop retrieving data
See the "DB" examples included in the Examples folder.
 |
 |