

|
Prior to using any database facilities, you should have correctly installed the Borland Database Engine (or equivalent) and the Database Delphi VCL components.
A Step by step guide to creating a database aware Chart....

- Place a TTable component and point it to the "DBDEMOS" database and the "ANIMALS.DBF" dBase table.
- Place a TDatasource component and set its DataSet property to Table1.
- Place a TDBGrid and set the DataSource property to DataSource1.
- Set the Table1.Active property to TRUE to see the Grid filled with table data.
- Place a TDBChart component onto a Form.
- Select and install a Pie Series as described in section The Chart Editor.
- Go to the Series page of the Chart editor by either double-clicking on the Series name, highlighting the Series and selecting Edit, or by selecting the Series tab.
- Select your Series from the Series listbox and go to the datasource tab.
From the listbox select your data source type.
There are 4 types of data source available. The DataSource style is a component property that may be one of the following:
‘No data’ if points are being added programmatically (at source code).
or...
‘Random values’ draw your Chart Series with random values.
or…
‘A function’ which may be:
One or more other Series (like LineSeries1, BarSeries2, etc.) which could come from this Chart or from another Chart in your project. A function may work with a combination of one or more other Series and an algorithmic function (min, max, average, etc.).
or..
A ‘Dataset’ which may be a:
TTable, TQuery, TClientDataset or any other TDataset component. (like Table1, TQuery1, etc.)
For our example, let's choose the 4th option from the previous section, ‘Dataset’ style. In our TDBChart we’ll include data from the table that we’ve already added to the form.
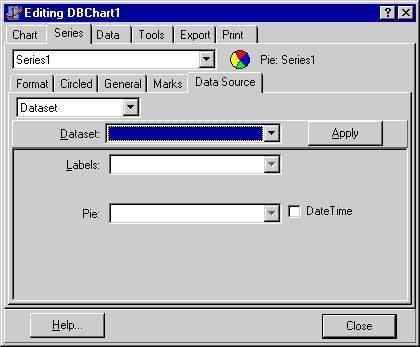
You need to select the listbox option A dataset to map this Series to the table that you have included in the project. As you make the selection you will notice new page options appear to define the dataset for the pie Series. Your editor should look like Fig. 7.
| Width1Width3Width1418Width3Width5599Fig. 7.
The Chart Editor screen showing the Data source tab for our pie Series |
Width1Width3Width1418Width3Width5599 |
All you need to define a simple dataset for the Series lies here. You have already included a table and datasource in your form, and set the table to active. But the options here offer you the flexibility to define the dataSeries in varying ways:
Click on the down-arrow for the ‘Dataset:’ combobox.
If you have an activated table in the form it will be
highlighted here.
Select your table.
Define the values that will be plotted in the Chart:
As we have defined a Pie Series we are presented with pie specific configuration options. Each Series has parameters that vary, but only slightly, in definition from the example below.
The Pie field is mandatory, and must contain a valid numeric field or a string field with values that can be converted to numbers.
In our example, choose the Weight field.
(The ANIMALS table is a collection of animal names with weight and size information.)
You can optionally select an Labels field to draw the corresponding string for each point on the pie.
In our example, choose the Name field.
This label will be used to draw the Pie Legend.
Note
Some Chart Series types have more than one figure to represent a point. Values that are plotted by date or time are an example of X Values Series. Not all date-time values should be equally spaced. The X Value is the specific horizontal position for each Y value. Later try deleting the pie Series and adding a Series of a different type, - ie. LineSeries -, you will see the option to apply X and Y values appear.
(We don't have X Values in a Pie Series.)
Now click the "OK" button.
The TDBChart component will show a Pie Chart and a Legend.
You are seeing exactly the same Chart you saw when you pressed F9 to run the project.
For a recap and further look at adding data to a TDBChart via another example, see How To Create Data Aware Charts